This section covers how to create and submit a licence application.
Ensure that you carefully read the details of the information that must be provided in your application. Failure to accurately describe the works and include all relevant files may result in a delay processing your application.
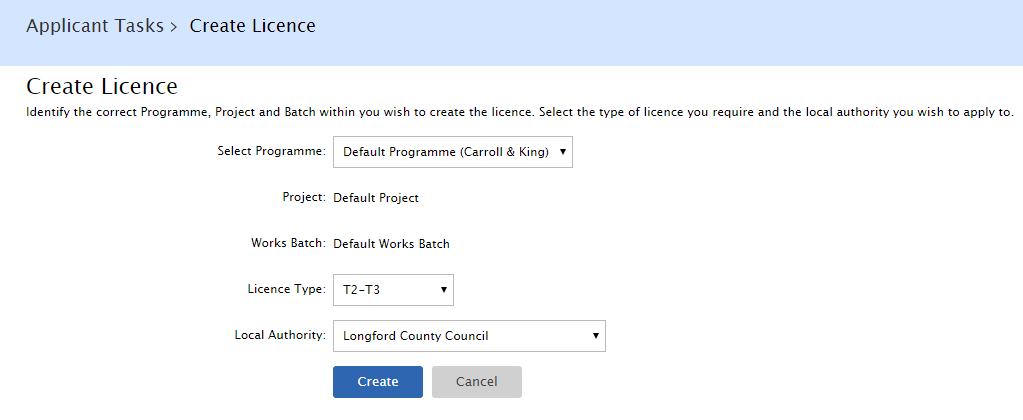
1.Click the Applicant Tasks menu. 2.Select Create Licence. 3.Choose the Programme, Project and Works Batch. (Most organisations will only need to use the Default Programme, Project and Works Batch) 4.Select the Licence Type: T2-T3. 5.Select the Road/Licensing Authority that you want to apply to. This should be the authority governing the road that you wish to excavate. 6.Click Create.
7.Read the Road Engineering Assets Declaration carefully before you proceed and click Confirm. A draft application will be created. |
Follow the on-screen instructions and provide the information required. For more information on the information collected on each tab, please refer to the help section links below: When all the information has been entered you can select Submit the Application button shown on sidebar. If you wish do not wish to submit the application yet, simply select the Home icon or another menu option. The application will be added to the Draft stage folder on the Applications menu. This application will be available to reopen and continue editing another time. |
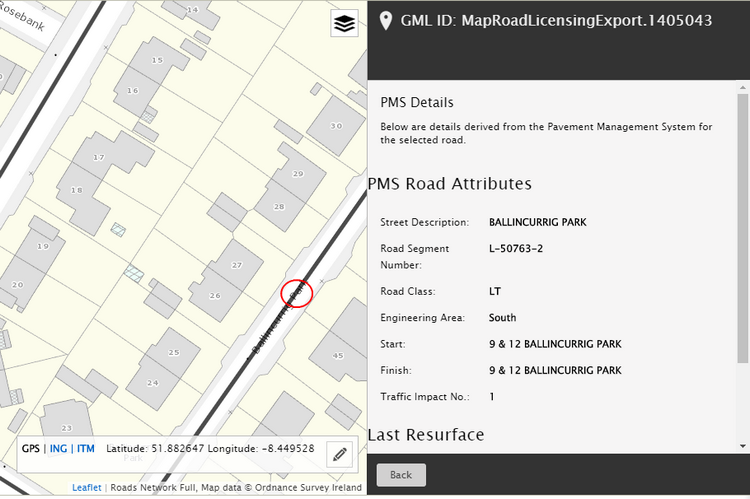
Location Description: This should clearly describe the address and/or location of the works. Road Segment Number: Enter the number of each road segment where works will be carried out.
You can change the map position either by clicking and holding the mouse on the map while dragging it to the position you want OR by entering coordinates. PMS Roads Schedule: Road Attributes such as the Road Segment Number and Traffic Impact Number can be viewed by click on a marked black line on the map, as illustrated below. This will shown the PMS Road Attributes which can be copied and used where required. This will show the Road Segment Number which you can copy and paste into the Road Segment Number field and click then Add Road. Repeat this for each road segment affected.
You will also want to take note of the Traffic Impact number as this will be required when selecting the Street Type of the excavation surface(s).
Marking your excavations Use the Marker or Polyline tool to draw the excavation or trench line on the map. For details on how to do this, refer to the Mapping section for details. |
Before submitting the application please carefully check that the information you have provided is accurate. You should be aware that if your application is refused, you may still be charged the application fee. If a tab heading includes a
|

1.Select the Submit the Application button shown on the sidebar.
If any Validation Issues found with your application e.g. mandatory information missing, or validity period start date that does not comply with the stated minimum advanced notice period, then you will not be able to proceed. To view the details of the issues, refer to each licence form tab showing an exclamation symbol (as shown below). Validation messages will be shown for any fields that have not been entered and where the data provided may need to be checked.
2.Enter any relevant note which you believe is relevant/important for the processor to know.
3.Submit Confirm. The licensing area will now be notified of your application. You may receive an email if they require any further information in relation to your application. Unless otherwise indicated, please ensure you do not commence any works until you receive instruction from the licensing authority. |
